Breakouts attempt to capture the moment price escapes a consolidation and starts a directional move. They’re attractive because a single strong expansion bar can pay for many small attempts. They’re tricky because markets often fake out—price pokes beyond a level, then snaps back.
This guide gives you practical, testable breakout methods, exact entry/exit rules, risk management, and tools to separate real expansions from head‑fakes. We’ll also show how algorithmic trading and AI trading can enforce your rules without hesitation.
Related reading on Indicators101:
- How to Set Stop‑Loss & Take‑Profit in Forex
- Risk Management 101: Position Sizing for Forex & Crypto
- How to Build & Backtest a Strategy in TradingView
- Indicators101: Beginner’s Guide to Algorithmic Trading
Promise: By the end, you’ll have two complete breakout playbooks you can backtest today, plus indicator filters and session/news rules to improve quality.
Core Concepts You Need First
- Structure: A breakout means price closes beyond a clearly defined boundary: range high/low, triangle, inside bar, previous day high/low.
- Compression precedes expansion: The best breakouts come from reduced volatility or tight ranges that build energy.
- Liquidity hunt: Many “breakouts” are just stop runs. Avoid chasing the first tick outside the level; demand confirmation.
- Context: Session timing and news risk matter. London/NY opens often fuel genuine moves; high‑impact news can create whipsaws.
Breakout Setups That Actually Test Well
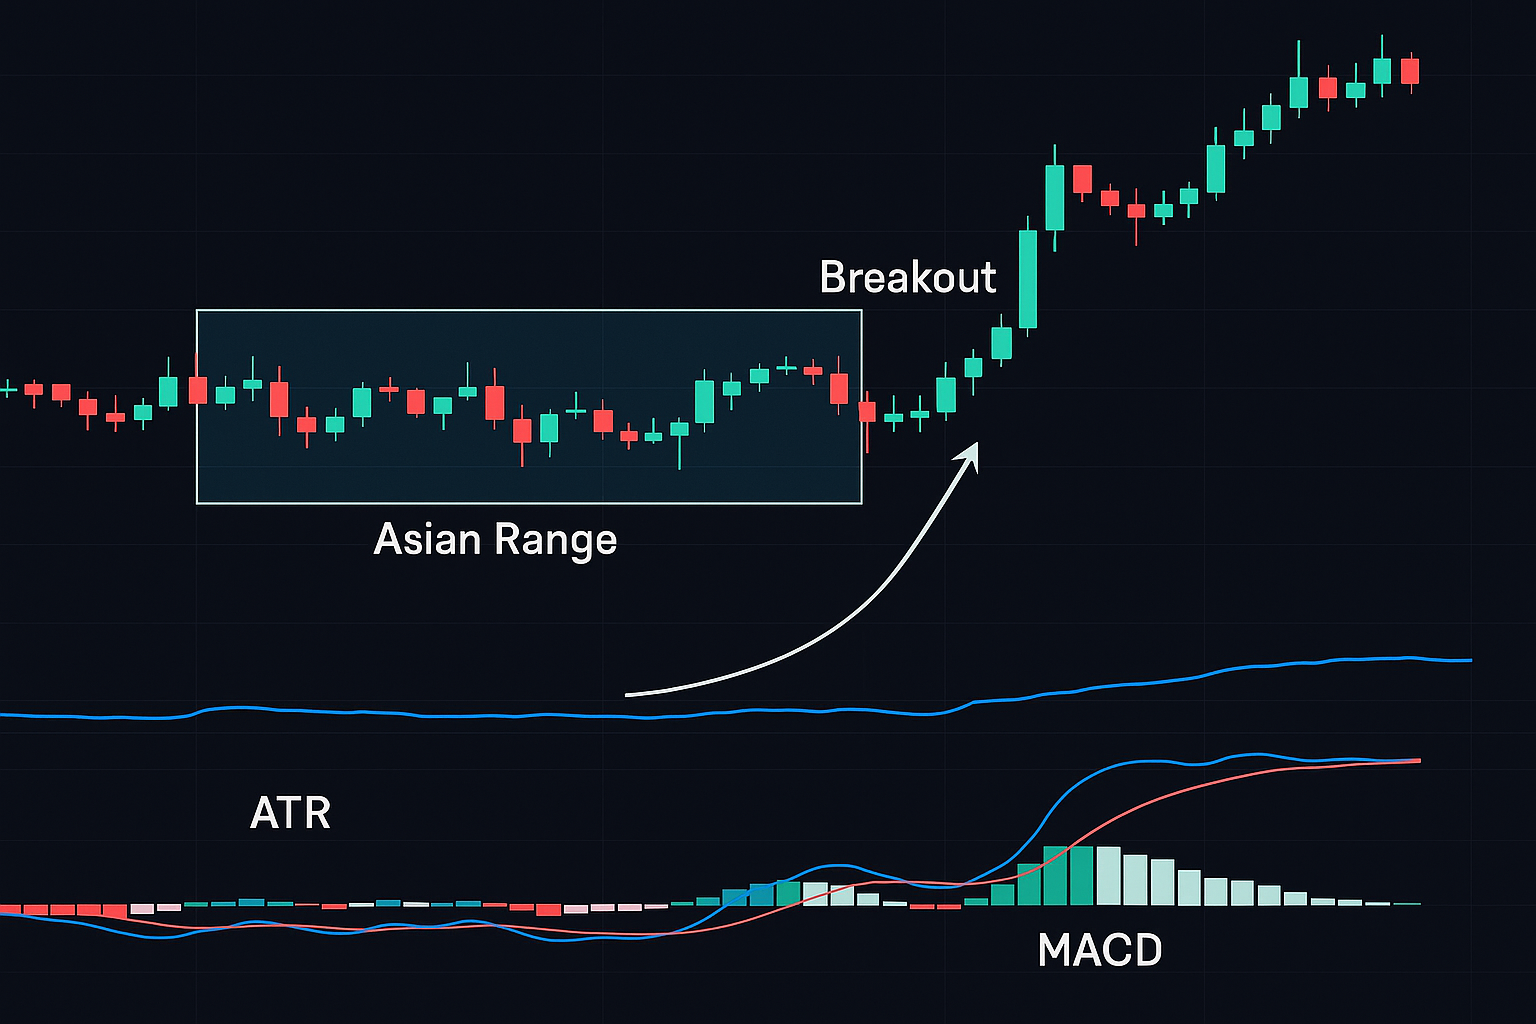
1) Asian Range → London Break (Intraday)
Idea: The London open injects liquidity that often resolves the Asian session’s tight range.
Rules:
- Define Asian range: the high/low from, e.g., 00:00–05:00 London time (adjust to your platform time).
- Entry trigger: After London open, take a trade only on a 15‑minute close outside the Asian high (long) or low (short).
- Volatility filter: Trade only if ATR(M15) is below its 20‑bar average before the break (compression first).
- Stop: Opposite side of the range or 1.5× ATR, whichever is wider.
- Targets: 1–2× the range height; keep a runner with an ATR trail.
- Guards: No new entries 10 minutes before high‑impact news.
Why it works: Combines structural break with session‑based liquidity and volatility compression.
2) Inside Bar / NRB Break (Multi‑Timeframe)
Idea: Break from a contraction bar (inside bar or narrow‑range bar) in the direction of the prevailing trend.
Rules:
- Identify an inside bar or narrow‑range bar (e.g., NR7 on your timeframe).
- Trend filter: Higher timeframe 50 EMA above 200 EMA for longs (reverse for shorts).
- Trigger: Close above the inside bar/NRB high (long) or below the low (short).
- Stop: Opposite side of the contraction bar ± a small buffer or 1× ATR.
- Targets: Fixed R‑multiples (TP1 at +1.5R, TP2 at +3R) with optional trail.
Why it works: Lets volatility compress so the breakout has room to expand.
3) Prior Day High/Low Break + Retest (Swing/Intraday)
Idea: Institutional levels like the previous day’s high/low attract orders. The cleaner move often happens on the retest.
Rules:
- Mark yesterday’s high/low.
- Trigger: Close beyond the level and then retest it from the other side with a rejection candle.
- Stop: Beyond the rejection candle or 1× ATR.
- Targets: Session ADR projection (e.g., 0.75–1.0× ADR) or fixed R‑multiples.
Why it works: Avoids the initial stop run and enters on confirmation when trapped traders fuel continuation.
Indicators That Improve Breakouts (Use a Few, Not All)
- ATR (Average True Range): Measure compression/expansion. Filter entries when ATR is below its 20‑bar average before the break; trail stops with ATR after entry.
- MACD (12/26/9): Require the MACD line above zero for long (below zero for short) on or near the breakout to confirm momentum.
- RSI (14): Watch for RSI > 50 for longs (<50> for shorts) to avoid fading momentum. Divergences warn of potential failure.
- Volume proxy: On forex spot, volume is imperfect, but tick volume helps. Prefer higher‑than‑average tick volume on the breakout candle.
- Session marker: Simple but powerful—tag London/NY open windows; quality improves around real liquidity.
Keep it lean: Structure + one volatility filter (ATR) + one momentum confirm (MACD/RSI) is enough.
Risk Management (Non‑Negotiable)
- Per‑trade risk: Start with 0.5%–1.0% of equity. Breakouts can slip; size conservatively.
- Stop location: Use the structure (opposite side of range/inside bar) plus an ATR buffer (0.3–0.7×) to avoid noise.
- Partial exits: Take 40%–50% at +1.5R, move stop to breakeven, then trail by 1.5× ATR or last swing.
- Daily/weekly circuit breakers: Stop at −3R/day or −6R/week. News days can cluster losses; protect mental capital.
- Correlated exposure: Limit the number of pairs with the same driver (e.g., multiple USD crosses breaking simultaneously).
Two Complete Breakout Playbooks (Copy/Paste Rules)
Playbook A — London Breakout with ATR + MACD Confirm (M15)
Bias: Neutral until break.
Rules:
- Mark Asian session high/low.
- Trade only if ATR(M15) < SMA>
- Enter on a close outside the range and MACD line above zero (long) or below zero (short).
- Stop at the opposite side of the range or 1.5× ATR (wider).
- TP1 at 1× range height; move stop to BE; TP2 at 2× range or trail by 1.5× ATR.
- Skip entries 10 minutes before scheduled high‑impact news.
Notes: This reduces fake‑outs by waiting for both close‑confirmation and momentum/volatility conditions.
Playbook B — Inside Bar Trend Break + Retest (H1)
Bias: With higher‑timeframe trend.
Rules:
- Higher timeframe (H4) trend filter: 50 EMA > 200 EMA for long setups (reverse for shorts).
- Identify an inside bar or NR7 on H1.
- Enter on close above the inside bar high (long). Optional: wait for a quick retest of the broken level and a rejection candle.
- Stop below the inside bar low − 0.5× ATR (buffer).
- TP1 at +1.5R; TP2 trail with 1.5× ATR or exit at next daily level.
Notes: The retest entry improves price and weeds out stop runs.
How to Code & Backtest in TradingView (Fast Start)
Starter logic (pseudocode):
- Compute ATR(14) and its 20‑bar SMA.
- Define Asian session H/L.
- Signal = (close > AsiaHigh OR close < AsiaLow>AND (ATR < ATR>AND (MACD zero‑line in breakout direction).
- Entry on confirmed bar close. strategy.entry() long/short accordingly.
- strategy.exit() with stop at other side of range and limit at 1×/2× range; add ATR trail once TP1 hits.
Backtest rules:
- Include commissions and slippage; breakout bars slip more.
- Test across multiple years and pairs (EURUSD, GBPUSD, USDJPY, XAUUSD if you trade metals).
- Validate with out‑of‑sample periods and walk‑forward if you tweak multipliers.
- Track expectancy (R/trade), profit factor (>1.2), max drawdown, time to recovery, and trades per week.
Avoid These Common Breakout Errors
- Chasing the first tick outside the range without a close—classic stop run.
- Skipping compression filters—breakouts from already‑expanded volatility often fail.
- Ignoring session/news context—fake‑outs cluster around unscheduled spikes; plan your windows.
- Stops too tight—place beyond the structure plus an ATR buffer.
- All‑in, all‑out exits—partials smooth equity without killing upside.
Advanced Tips (When You’re Ready)
- Use ADR/ATR projections to set realistic TP bands by session.
- Time‑based filters: No new entries after a specific hour (e.g., post‑NY lunch) when trends tend to stall.
- Multi‑break logic: After a valid breakout + trend day, consider continuation entries on pullbacks to VWAP/EMA with momentum confirms.
- Tick‑volume confirmation: Prefer breakouts with above‑average tick volume relative to the last 20 bars.
- AI/Algo angle: Add a simple classifier that tags bars as compression vs. expansion (e.g., ATR percentile). Trade only when compression precedes expansion for X bars.
Practical Numbered Examples
Example 1: EURUSD M15 London Break
- Account $10,000; risk 1% ⇒ $100.
- Asian range 1.0850–1.0870 (20‑pip height). ATR(M15) below ATR MA.
- Close at 1.0874 (outside high) with MACD above zero → long.
- Stop: range low 1.0850 (24 pips with buffer). Position size = $100 ÷ 24 pips ≈ $4.17/pip (~0.42 mini lots).
- TP1: +20 pips (1× range) → take 50% and move to BE. TP2: +40 pips or trail 1.5× ATR.
Example 2: GBPUSD H1 Inside Bar Trend Break
- H4 trend up (50>200). Inside bar forms at 1.2760–1.2790.
- Break close at 1.2795 → long. Stop at 1.2760 − ATR buffer (e.g., 10 pips) = 1.2750.
- Risk 0.75% on $12k ⇒ $90. Stop distance 45 pips → size ≈ $2/pip (0.20 mini lots).
- TP1 at +1.5R (67.5 pips); trail remainder by 1.5× ATR.
FAQs
Are breakouts or pullbacks better?
Neither universally. Breakouts capture early legs; pullbacks often offer better price. Many traders use both: breakout for initial move, pullback for continuation.
What’s the best timeframe for breakout trading?
M15–H1 for intraday; H4–D1 for swings. Lower timeframes require tighter execution and cost modeling.
Why do my breakouts fail so often?
Likely entering on wicks without a close, trading during high volatility without compression, or placing stops too tight. Add ATR and momentum filters; respect session/news.
Can I automate breakout strategies?
Yes. TradingView/MetaTrader can code all rules. Start with alerts → semi‑auto. Add risk caps and news lockouts to avoid emotional overrides.
How big should my stop be?
Beyond the structure (range/inside bar) plus an ATR buffer (0.3–0.7×). Size position from that distance.
Summary & Next Steps
The highest‑quality breakouts come from compression + confirmation + context. Write explicit rules, size from risk, and demand a close beyond structure with momentum confirmation. Backtest across regimes, forward test on tiny size, and consider algorithmic trading or AI trading to execute consistently.
Keep learning on Indicators101:
- Risk Management 101: Position Sizing for Forex & Crypto
- How to Set Stop‑Loss & Take‑Profit in Forex
- How to Build & Backtest a Strategy in TradingView
Call to Action: Ready to systematize your breakout trading? Give our Indicators a try at AITradingSignals.co to spot compression, confirm momentum, and manage ATR‑based exits. Prefer a guided path?
Check out our courses at aitradingsignals.gumroad.com for step‑by‑step strategies and Pine Script labs.
Compliance & Disclaimer: This educational material is not investment advice. Trading involves risk, including possible loss of principal. Past performance does not guarantee future results. Ensure any images or charts you publish are original or properly licensed.