More lines on a chart rarely mean more edge. Too many indicators produce conflicting signals, curve‑fitted parameters, and decision paralysis. The fix isn’t to throw indicators away—it’s to give each one a job and limit your stack to one tool per job.
This guide shows you how to build a minimal, testable indicator framework for forex and crypto, complete with plug‑and‑play rules, examples, guardrails against overfitting, and automation tips for algorithmic trading/AI trading.
Related on Indicators101:
- Price Action Trading Basics (Support/Resistance Breakouts)
- How to Use Momentum Indicators in Forex Trading
- Using Volume Indicators to Confirm Breakouts
- How to Build & Backtest a Strategy in TradingView
- Indicators101: Beginner’s Guide to Algorithmic Trading
Promise: In 20 minutes you’ll have a lean blueprint for combining indicators—no clutter, no contradiction—plus two complete strategies you can backtest today.
The One‑Tool‑Per‑Job Framework
Every indicator you add must answer exactly one question. That’s it.
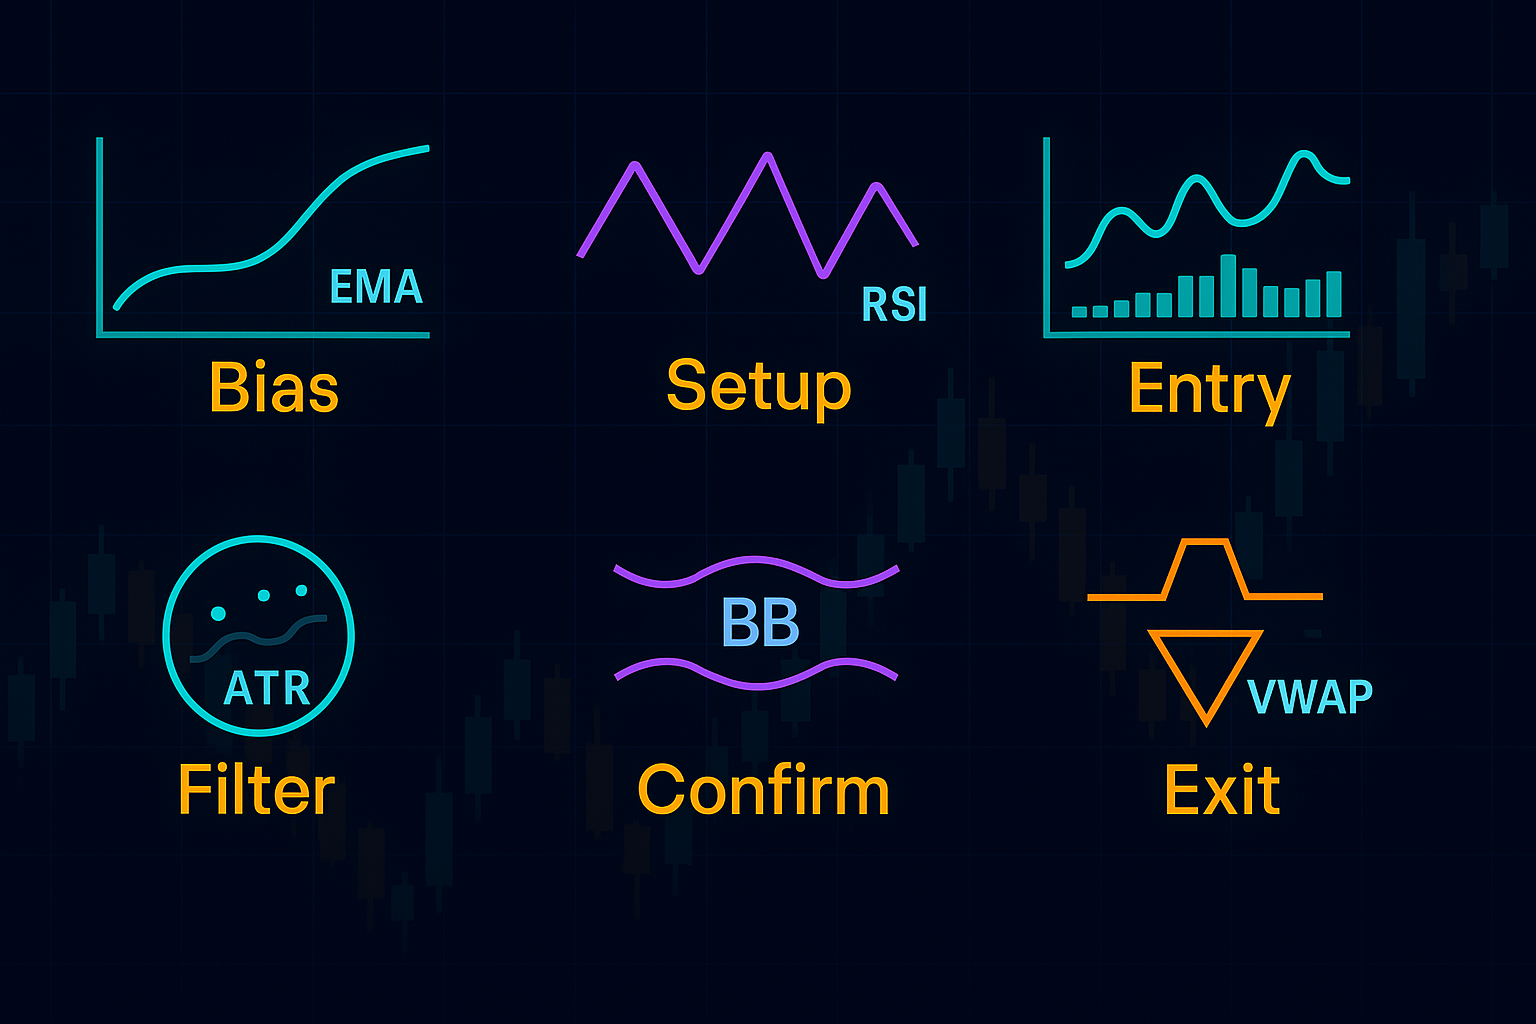
- Bias / Regime (Lagging): Am I allowed to be long, short, or flat? Pick one: 50/200 EMA (or SMA on higher TFs) or Supertrend.
- Setup / Structure (Price): Is price compressing, trending, or at a key level? Pick one: Horizontal S/R (prior day/week high‑low), Donchian channel, or Bollinger Band squeeze.
- Trigger / Momentum (Leading): What turns the setup into an entry? Pick one: RSI(14) 50‑level re‑cross, Stochastic(14,3,3) cross, ROC(10) threshold, or MACD signal after zero‑line agreement.
- Confirmation (Lagging/Volume): Is there commitment behind the move? Pick one: MACD zero‑line, RVOL ≥ 1.5–2.0 (or tick RVOL in forex), OBV/CMF direction.
- Volatility & Risk (Lagging): Where do stops/targets go? Pick one: ATR(14) for buffers and 1.5× ATR trailing, or Chandelier Exit.
- Context (Optional): External conditions that gate risk or entries. Pick one: Session filter (London/NY), news lockout window, funding/OI thresholds (crypto).
Rule: If two indicators answer the same job, remove one—unless tests prove a clear expectancy lift out‑of‑sample.
Parameter Discipline (How Not to Curve‑Fit)
- Start with textbook settings: RSI(14), MACD(12/26/9), ATR(14), BB(20,2), EMAs (20/50/200).
- Only tune inside tight, logical ranges (±20% around defaults).
- Prefer plateaus over peaks: if small changes nuke performance, you’re overfit.
- Use walk‑forward testing: lock parameters on one window, evaluate on the next.
- Keep a change log; every tweak must beat the baseline on out‑of‑sample data.
Build Your Stack (Two Proven Archetypes)
Stack A — Trend Pullback (Clean, High‑Probability)
Jobs & Tools
- Bias: 50 EMA > 200 EMA (longs only).
- Setup: Pullback to 20 EMA or prior swing.
- Trigger (Momentum): RSI(14) dips to 40–50 then closes back above 50.
- Confirmation: MACD line above zero on/near entry bar (or keep it simple: price closes back above 20 EMA).
- Volatility/Risk: Stop = swing low − 1× ATR; partials at +1.5R; trail 1.5× ATR.
- Context: Trade during London/NY overlap (forex). In crypto, reduce size if funding > +0.05%/8h.
Long Rules (H1–H4):
- 50 EMA > 200 EMA; price above 200 EMA.
- Price pulls back to 20 EMA; RSI prints 40–50 zone.
- Enter when candle closes back above 20 EMA and RSI closes > 50.
- Stop below swing − 1× ATR; TP1 +1.5R (40–50% off, move to BE); TP2 trail 1.5× ATR or next weekly level.
- Skip 10–15 minutes before red‑folder news.
Why it works: Lagging EMAs define trend; leading RSI times the turn; ATR enforces consistent risk.
Stack B — Compression Breakout (Fast, Rules‑Driven)
Jobs & Tools
- Bias: Neutral until break (or bias with 50/200).
- Setup: Bollinger Band squeeze (BandWidth bottom 30% of last 6 months) or tight range.
- Trigger (Momentum): ROC(10) > +0.3% on the breakout bar for longs (reverse for shorts).
- Confirmation: MACD line > 0 (longs) / < 0>RVOL ≥ 1.8.
- Volatility/Risk: Stop = other side of base − 0.5× ATR (or 1.5× ATR if wider).
- Context: No new entries within 10–15 minutes of major news; for crypto, cap size if funding extremes.
Long Rules (M15–H1):
- Identify 10–40 bar base with ATR < ATR> (compression).
- Breakout candle closes above base and ROC(10) > +0.3%.
- Confirm with MACD > 0 (or RVOL ≥ 1.8).
- Enter on close or a 25–40% pullback into the breakout bar.
- TP1 = 1× base height (scale 40–50%, move to BE); TP2 = 2× or trail 1.5× ATR.
Why it works: Volatility leads; momentum/volume confirm; ATR structures risk.
How Many Indicators Is “Too Many”?
- Green zone (ideal): 3–5 total (one per job).
- Yellow zone: 6–7; justify each with out‑of‑sample improvement.
- Red zone: 8+ overlapping tools; expect contradiction and delay.
Sanity test: If you can’t describe your entire system in one paragraph, it’s too complicated to trade—or to automate.
Conflict Resolution (When Signals Disagree)
- Hierarchy: Price/structure > Bias filter (50/200) > Volatility (ATR) > Momentum trigger > Volume confirm.
- Rule: If the bias and trigger disagree, skip. If trigger fires but volume is weak, prefer a retest entry. If ATR is elevated (no compression), avoid breakout plays.
Risk & Exposure Rules (Don’t Skip This)
- Per‑trade risk: 0.5%–1.0% on majors/BTC/ETH; 0.25%–0.75% on alts.
- Total open risk cap: ≤ 3% across all positions.
- Correlation cap: Don’t stack multiple USD‑longs or multiple BTC‑beta alts simultaneously.
- Circuit breakers: Stop for the day at −3R or the week at −6R; review before resuming.
- Execution: Assume slippage on breakouts; size smaller and use ATR buffers.
Backtesting Workflow (So You Don’t Fool Yourself)
- Write rules exactly (jobs, indicators, thresholds, sessions, stops, exits).
- Model costs (spread/fees/slippage; funding for perps).
- Test on multiple assets & regimes (EURUSD/GBPUSD/USDJPY; BTC/ETH + a liquid alt; high/low ATR months).
- Use walk‑forward validation: tune minimal ranges, roll forward, record.
- Track: expectancy (R/trade), profit factor (>1.2), max drawdown, time to recovery, trades/week.
- Forward test on paper or tiny size for 2–6 weeks; compare live stats to backtests.
Keep a benchmark (e.g., price action + ATR only). Your stacked system must beat it out‑of‑sample.
Practical Examples (Math Included)
Example 1 — EURUSD H1 Trend Pullback
- Equity $10,000; risk 1% ⇒ $100.
- Stop distance (swing + ATR buffer) = 26 pips → size ≈ $100 ÷ 26 ≈ $3.85/pip (~0.39 mini lots).
- Entry on RSI re‑cross > 50 and close above 20 EMA; TP1 +1.5R (39 pips); trail 1.5× ATR.
Example 2 — BTCUSDT M30 Compression Breakout (Perps 3×)
- Equity $6,000; risk 0.5% ⇒ $30.
- Base height 1.2%; stop incl. buffer 0.9% → Notional = $30 × 3 ÷ 0.009 ≈ $10,000.
- ROC(10) > +0.3%, MACD > 0 at breakout; TP1 +1× base (1.2%); TP2 +2× or ATR trail.
Common Overload Mistakes (And Fixes)
- Duplicating jobs (RSI + Stoch + CCI): Pick one momentum tool.
- Chasing perfect alignment: Accept that some winners won’t meet every checkbox. Trade the edge, not perfection.
- Optimizing ten knobs at once: Tune one parameter, re‑test, then move on.
- Ignoring data realities: In forex, use tick volume as relative only; in crypto, match test venue to execution venue; account for funding.
Automation & AI — Make Consistency the Edge
- Encode jobs as modules: bias(), setup(), trigger(), confirm(), risk(). Swap tools without rewriting the system.
- Alerts → Semi‑auto → Auto: Start with alerts for triggers/confirms, then let bots handle position sizing, partials, and ATR trails.
- AI assists: Use ML to rank conditions (e.g., ATR percentile + RVOL + funding) and gate risk, but keep deterministic entries/exits.
FAQs
How many indicators do I really need?
Three to five—one per job (bias, setup, trigger, confirm, risk). That’s enough for most profitable systems.
Is price action an indicator?
It’s your structure layer (levels, patterns). Indicators should serve structure, not replace it.
What’s the best momentum tool?
Start with RSI(14) or MACD. Keep whichever improves expectancy out‑of‑sample.
Do I need volume for forex?
Use tick volume as a relative proxy (RVOL vs its own average). Combine with structure and ATR.
How do I avoid conflicting signals?
Assign a job to each tool and set a hierarchy for tie‑breaks. If key jobs disagree, skip.
Summary & Next Steps
Combine indicators by job, not by fashion: bias, setup, trigger, confirm, risk, optional context. Limit to one tool per job, enforce ATR‑based risk, and prefer robust parameter plateaus to over‑tuned peaks. Backtest across regimes, forward test small, and let algorithmic trading tools execute consistently.
Call to Action: Ready to simplify and systematize? Give our Indicators a try at AITradingSignals.co for clean bias/trigger/confirm modules and ATR‑based risk tools. Prefer a guided path? Check out our courses at aitradingsignals.gumroad.com for step‑by‑step playbooks and backtesting labs.
Compliance & Disclaimer: Educational content only—not investment advice. Trading involves risk, including possible loss of principal. Past performance does not guarantee future results. Publish only original or licensed images/charts.